As a person who likes to do everything myself, I never thought I would be doing plumbing. My husband is very good with all of the construction and maintenance of the house, and does most of it with me as a mere assistant to "hold the light here" and "get me a wrench" and "QUICK, turn off the water!" Needless to say, I haven't had to actually DO any plumbing myself. But I have watched him do a lot of different things. And that's a good thing, because now I know I CAN do basic plumbing if the need should arise. Again.
Since we moved in our house (a year and a half ago) one of our kitchen sink drains (there are separate drains for each side of sink) has never drained well. I usually just try to avoid that side, but I finally got fed up with it. I decided to play plumber today and I took off the trap to see if there was a clog. The "trap" is the U-shaped pipe under your sink, for those of you who don't know). I cleaned out lots of gunk..... but not enough gunk to stop the water from flowing. So I decided to check the pipe that goes from the trap to the wall. OH. MY. GOSH!!!! I'm sure this thing has been clogged for YEARS. And let's just say it's a good thing I don't have a sensitive gag reflex! Seriously! That clog covered 95% of the pipe opening......
and this clog went ALL THE WAY TO THE WALL! More that 18 inches of solid blockage!!! How do you even CLOG a pipe like that??? One of the grossest things I have seen. Ever. (This picture doesn't do it justice... and it got even worse as I dug deeper and deeper into the pipe). But after a half an hour of digging and scraping with various tools (except for the actual pipe snake which I am afraid to use and will let my hubby do later) the pipe was as clear as it was going to get.
I was trying to save Danny a job.... which I did. Sort of. While examining the pipe, I found that it is rusted almost all the way through and needs replacing (to avoid a WAY bigger disaster). So, add another job to HIS list, because I am not THAT savvy with the plumbing. LOL! But at least, for now, the water flows without pooling up in the sink..... Yay me! :-)
Friday, January 4, 2013
Tuesday, November 20, 2012
Turkey Crayon Holders
It's been a VERY long time since I've done a blog post. So, I'm sorry to those who have been waiting...... I have lots of ideas, and even some drafts, but I've been so busy with Halloween and working at the kids' schools that I just haven't had time to finish a post. With three kids, a business, and endless housework, there just isn't a lot of time left for other stuff. Add in the holidays and FORGET IT!
So I told myself that this week, since the kids are out of school, I would find the time to finish a post. ANY post. Of course, just as I sat down at the computer, I realized that I really should be getting ready for the 22 people coming for dinner on Thursday, and that I still haven't done any fun Thanksgiving crafts with the kids! (BTW, I will be posting, in the near future, the recipes for my husband's Bleu Cheese Pear Vinaigrette and Red Bean Tasso Soup that we will be having for Thanksgiving dinner. YUM!)
So, back to the craft.....
I have decide to put butcher paper and crayons on the kids' table this year so that they will have something to do during dinner. Of course, I can't just throw crayons on the table! I looked for little baskets or bowls or something, but couldn't find anything just right. Then I saw some little baby food jars that were just the right size. But really, really ugly! So, we decided to turn them into Turkeys! They are really easy, but I will give step by step instructions below. Here is one of them finished. Isn't he adorable?
My 6 year old said, while we were making them, "Mom, these are so cute! We should put this on Pinterest!" Haha! He knows me so well.
Here's what we did.
Step 1: Cut a strip of brown paper the height of your jar (we used a plain lunch bag because we were out of brown construction paper). Using hot glue, glue the strip around the jar as shown below.
Step 3: Glue feathers to the opposite side of the jar as the head. And voila! Cute Turkey Crayon Holders!
Saturday, September 29, 2012
Adding New Chicks to the Flock
I am fairly new to chicken ownership, and I've been having to kind of "learn as I go." Our feed store is helpful with teaching me what food and bedding materials to use, but when it comes to the actual care of the chickens, I'm on my own. (Thankfully I have the internet to guide me.... though some things you just have to figure out on your own).
My first obstacle came when one of my original chicks turned out to be a rooster. I don't have anything against roosters, but I wasn't about to have him crow each morning and wake the neighbors (I live in town, not in the country). The other reason I couldn't keep the rooster is a mental thing. I am fine eating fresh eggs as long as I am SURE that they are not fertilized. I do not EVER want to crack open an egg and see part of a chick forming. Eww.
See my post here for how I dealt with that situation.
Everything went along smoothly and my chicks started laying beautiful and delicious eggs. With three hens, I was getting about a dozen eggs a week. This amount was just about right for my family of five.
My next obstacle came when I decided to get a few more chickens so I could have extra eggs to sell or give away. I got some more chicks and kept them in the garage to grow big enough to add to the flock. They grew, and soon it was time to put them outside with the others. Easy, right? Wrong.
My lead hen, Flag (the red one in the pictures below) was a little upset at my wanting to disturb her pecking order and decided that she would attack the little ones.
I was stuck. The little ones were too big to keep in the garage and too little to put in with the other hens.
Long story short, I ended up putting the little chicks in an enclosed area within the fenced area where the other hens are. You can see in the first picture the coop on the right and the little chicks' enclosure on the left (baby gate type enclosure with cardboard top).
After about two weeks, the hens got used to the chicks being around and I was able to integrate them. My red hen still pecked them, but they quickly fell into line in her "pecking order" and now all six are getting along fine. Well, almost. The three little ones (who aren't little any more) still don't roost inside the coop, but rather on the roof! And when I feed I have to make two food areas because Flag chases the chicks away from her food. Oh well, at least she isn't trying to peck them to death any more, right?
Coke in the Toilet
I like my toilets to be clean. (I think everyone does.) In fact, even though I don't use a lot of chemicals to clean my house, the toilets are a place that I'm not afraid to use bleach. I want to know that they are REALLY clean. You know what I mean?
With three little kids, it is extra important to keep the germs away.
When we bought our house, the whole place was nasty. The first thing I did was scrub the bathrooms. I mean, I REALLY scrubbed them. With bleach.
All of the main bathrooms got clean, but there was one stubborn toilet in the basement that just didn't want to cooperate. I knew it was disinfected, but it just wasn't clean. It's not a bathroom we use often (it's in a room that is being renovated), so I wasn't that worried about it. But over the past few months it has started to bug me. No matter how much I scrubbed, it still looked dirty! I knew there must be a way to get rid of the rust and hard water stains (without spending a lot of money or using crazy harsh chemicals).
While looking for recipes for homemade bathroom cleaners, I came across this post HERE. Coke in your toilet? What?!?
Of course I HAD to give it a try. I mean, what did I have to lose? I didn't have any Coke, but I did have some Diet Dr Pepper. I've seen what Diet Dr Pepper can do with a Mentos....... and to a penny..... so I was confident that it would work as well as a Coke.
Here is the before picture. I cleaned this toilet. I swear. That discoloration is from the rust stains. Eww.
I dumped a can of Dr Pepper in the bowl, and then dumped another one in just to be sure there was enough soda to do the work. (The website linked above used a 2-liter, so I probably should have used more, but this is all I had.)
Toilet looks even nastier with the soda in it. Bleh.
I let the soda sit for 30 minutes and then gave it a quick scrub with a toilet brush. One flush later and WOW!
Ok, now THAT is clean. Yay! (There is still one tiny ring of rust around the top of the water line, but overall I would consider this a success. I might try again with a 2-liter of actual Coke, just to see.)
Kinda makes you wonder what soda does to your insides.......
Tuesday, September 11, 2012
Canned Tomato Fail
Argh! I get so frustrated when something doesn't work out.
I've been getting tons of tomatoes off my plants. Yay! This is just two days worth:
Then, to prepare them for canning, I spend hours blanching and peeling them:
I've canned a thousand tomatoes without any problems. Today? I wasted 3 hours of peeling, coring, chopping, and boiling. And it wasn't just time that got wasted......I wasted 20 POUNDS of tomatoes!! I don't know what I did wrong, but ALL eight of my pint jars leaked when I took them out of the canner. And that means that ALL eight jars are not sealed properly and have to be tossed. What a waste!
See the red on the towel under the jars? That shouldn't be there. As soon as I pulled the jars out of the canner, they bubbled out through the seals. That means that there is food between the lid and the jar which can spoil and ruin the seal.
I'm glad that summer is coming to an end. I love the warm weather, but I'm ready for crisp fall air and sweaters. And most of all, I'm ready for NO MORE TOMATOES to can. I think I'm "canned out" for the year. I know I shouldn't focus on this one failure, but I hate wasting my time. Grrr!
**UPDATE**
It turns out I didn't have to waste my tomatoes. All of the jars sealed, though with tomato juice in between the lid and jar. So, as long as I used them quickly (before the juice in the seal broke down), I didn't have to toss the tomatoes. (I hate to waste food). I made salsa, tomato sauce, sweet and sour sauce, and fed tomato based meals to my family all week. I don't feel so bad about my Tomato Fail anymore. :-)
I've been getting tons of tomatoes off my plants. Yay! This is just two days worth:
Then, to prepare them for canning, I spend hours blanching and peeling them:
I've canned a thousand tomatoes without any problems. Today? I wasted 3 hours of peeling, coring, chopping, and boiling. And it wasn't just time that got wasted......I wasted 20 POUNDS of tomatoes!! I don't know what I did wrong, but ALL eight of my pint jars leaked when I took them out of the canner. And that means that ALL eight jars are not sealed properly and have to be tossed. What a waste!
See the red on the towel under the jars? That shouldn't be there. As soon as I pulled the jars out of the canner, they bubbled out through the seals. That means that there is food between the lid and the jar which can spoil and ruin the seal.
And not only that, the juice/water is on the bottom and all of the tomatoes floated to the top. Now they are not submerged under liquid like they are supposed to be.
What did I do wrong? Did I over or under tighten the lids? Did I boil them too short or too long? I'll never know. I thought I did everything the same as the last time (when all the jars sealed with no problems).
I'm glad that summer is coming to an end. I love the warm weather, but I'm ready for crisp fall air and sweaters. And most of all, I'm ready for NO MORE TOMATOES to can. I think I'm "canned out" for the year. I know I shouldn't focus on this one failure, but I hate wasting my time. Grrr!
**UPDATE**
It turns out I didn't have to waste my tomatoes. All of the jars sealed, though with tomato juice in between the lid and jar. So, as long as I used them quickly (before the juice in the seal broke down), I didn't have to toss the tomatoes. (I hate to waste food). I made salsa, tomato sauce, sweet and sour sauce, and fed tomato based meals to my family all week. I don't feel so bad about my Tomato Fail anymore. :-)
Cleaning the Stove Hood Filter
Okay. I'm a little embarrassed to post these pictures for all to see. This is my stove hood filter.
In my defense, we had some brick work done in the kitchen and the brick dust stuck to the oil, making it look even worse. Gross!
I've tried scrubbing it, but that oil is really hard to get off. I hate washing normal dishes. Washing this was a hundred times worse.
Until now.
All you need is a big pot and some baking soda! NO SCRUBBING!!!!
Fill your biggest pot with water. Just as it comes to a boil, add 1/2 cup baking soda.
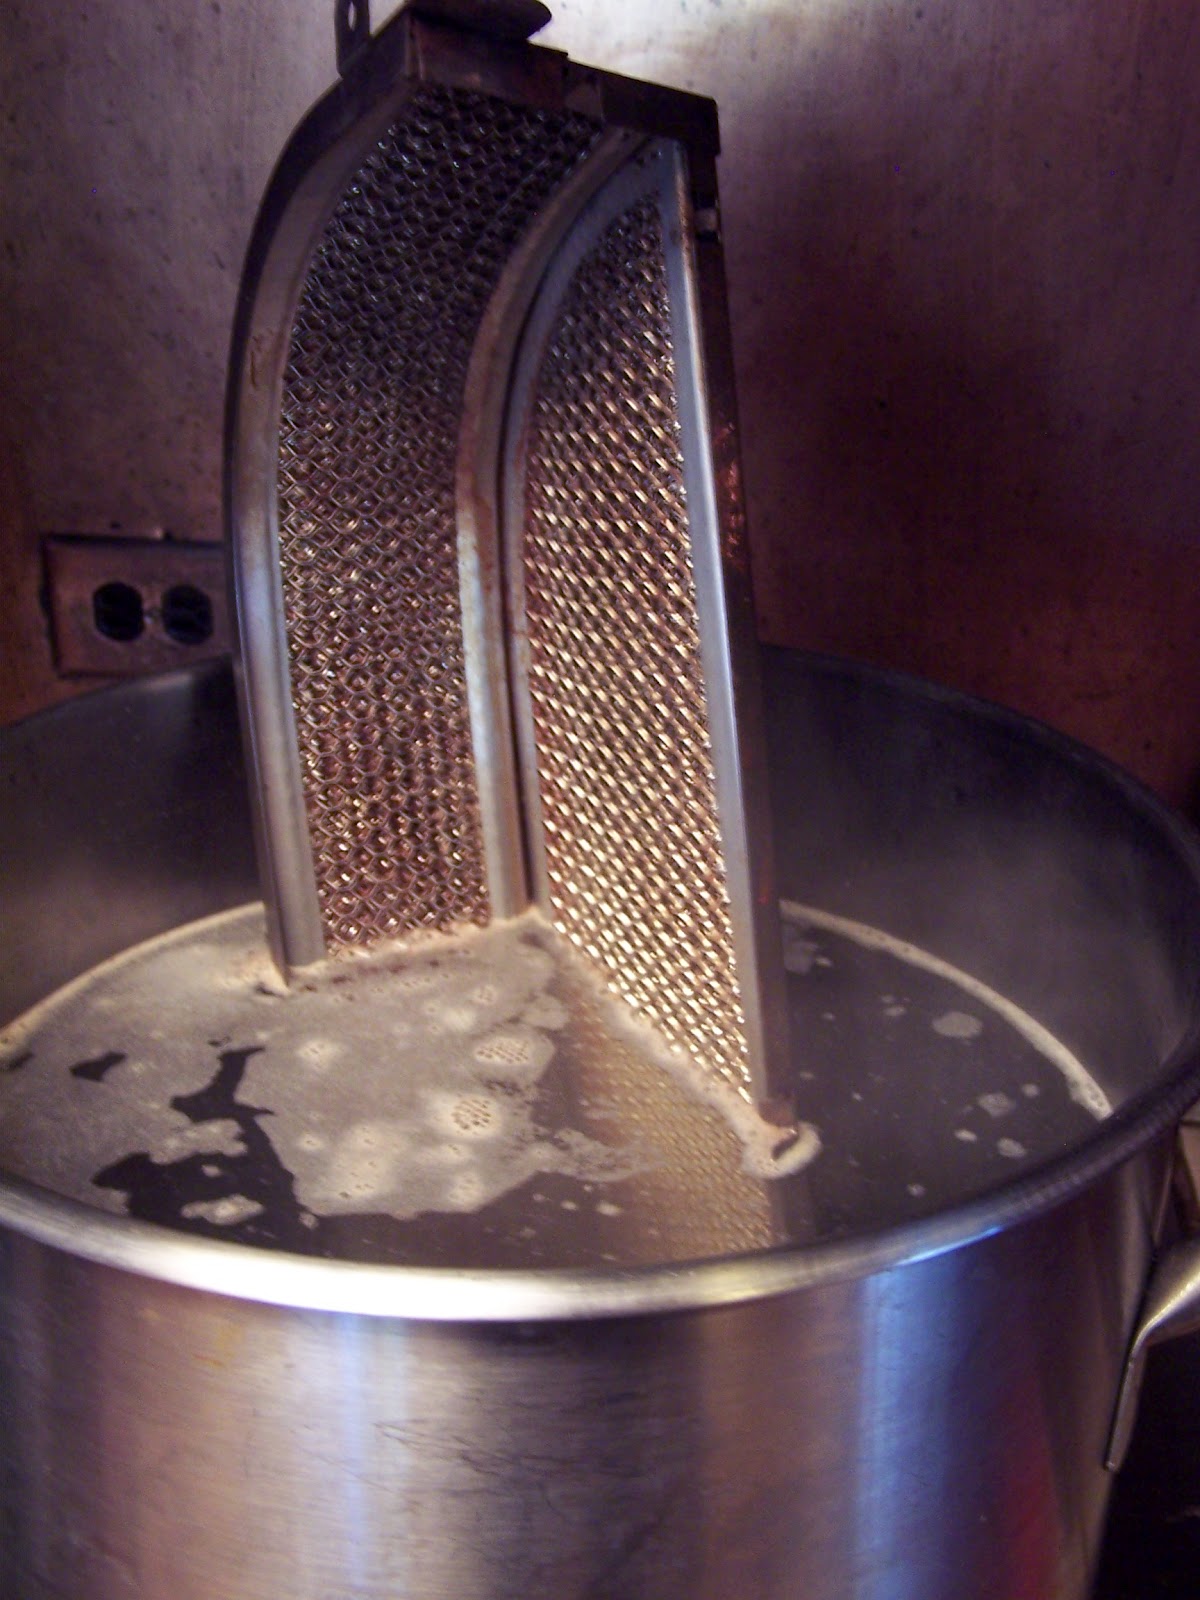
You probably don't have a pot big enough for your whole filter, so just boil half and then turn it over and boil the other side. Here is a picture of my filter in the pot. You can already start to see the water getting dirty!
After a few minutes, and NO SCRUBBING, this is what my filter looked like. See that nasty stuff on the left side? That was the part sticking out of the water. See the right side? It's COMPLETELY CLEAN!
Friday, September 7, 2012
The Curse of the Zucchini
I love gardening. Especially when the time comes to harvest the veggies. This year, my peppers didn't produce ANYTHING, but my tomatoes did well enough for me to can a few batches of sauce, salsa, and just plain chopped tomatoes.
And then there was the zucchini plant.
The first few harvests made me so happy. Sauteed zucchini for dinner and zucchini bread for breakfast. Yum!
And then they kept coming. And coming. And coming!
And no matter how fast I picked them, they just kept getting bigger and bigger! I would see one the size of my finger and think to myself, "Oh, good, it will be the perfect size for picking tomorrow." And then tomorrow comes and WOW! It's the size of my foot! How the heck did it grow that much in ONE NIGHT?!?!
For the last month I have had a bowl of zucchini on the counter that never gets empty. I even have to throw some away because they start to go bad! I tried keeping them in my fridge, but they started to take over (like no more room for milk or eggs), and some of them were just too big to fit at all.
Needless to say, I just CAN'T eat any more sautéed zucchini. And you can only have so much shredded zucchini and zucchini bread in the freezer.
I needed a few new things to make with the overload of zucchini we were picking. (Note to self: DEFINITELY never plant more than one zucchini plant. I don't know what we would do if we had even MORE zucchini.)
Here are some of the ideas I found, and the recipes to go with them.
Fried Zucchini Cakes I found the recipe here. Basically, you shred up some zucchini and toss it with seasonings and breadcrumbs (and an egg to hold it together). Form it into little round "cakes" and fry it in a pan until brown (I like to finish them in the oven). Great as a main course with some dipping sauce, or as a side dish.
Zucchini Bread with Pineapple I have made many different versions of zucchini bread (using milk, orange juice, nuts, chocolate chips, etc.), but never with pineapple chunks. I had to leave out the raisins and nuts so my kids will eat it, but other than that I followed the recipe found here.
Quinoa Salad with Zucchini Cook quinoa according to directions, but use chicken broth instead of plain water. Cube zucchini and sauté it quickly (just enough to make it not raw). Blanch some corn and peas (fresh or frozen). Slice a red onion. Dice tomatoes (fresh or sun dried). After the quinoa is cooked and cooled some, mix in the veggies that you prepped (whatever ratio you like, but having more quinoa than veggies for best results). Mix in chopped fresh herbs of your choice (I like oregano, thyme, and mint). Toss with you favorite vinaigrette. Add goat cheese on top of each serving. YUM!
Curried Zucchini Soup This is a really quick and easy soup to make. We ate it as a mail course with some fresh baked bread. I think I like it better warm than cold, but you can eat it either way. See the recipe here.
Zucchini Chips I didn't actually try these, because I am seriously zucchini'd out this year. But I plan to try these next year. They seem pretty easy, and maybe my kids would eat them. (Ha! Yeah right!) Slice zucchini and spread out evenly over sheet pan. Spray with oil, season with salt and pepper (and in my house we would use cajun or mexican seasoning too), and bake at 225 degrees for 45 minutes. Rotate the pan and bake for another 30-35 more minutes until browned.
Zucchini Chocolate Brownies I was pretty skeptical about this recipe. I mean, zucchini brownies? Sounds gross. But I was desperate to find new ways to use my over abundance of zucchini, so I tried it. At first I thought we would eat it without the frosting, as a way to make it more healthy. Ew. It tasted like zucchini dipped in chocolate. And it wasn't even CLOSE to having brownie texture. Bleh. So I went ahead and made the frosting, hoping it would at least make them edible enough that I didn't have to waste them. Oh. My. Gosh. Add a little homemade whipped cream? YUM! Seriously good! Not just "good enough." But actually good! Chocolatey and gooey (and sort of healthy, I guess). I made another batch and froze it for future "chocolate emergencies."
(I'm sorry, I forget where I got the recipe. Luckily I had it printed out so I can give it to you here.)
Ingredients:
2 cups chopped raw zucchini
1/4 cup vegetable oil or melted butter
1/2 cup low fat yogurt (I used greek, but regular would work too)
1 1/4 cup sugar
1 Tbsp vanilla extract
2 cups whole wheat pastry flour (I used all purpose white flour)
1/2 cup unsweetened cocoa powder
1 1/2 tsp baking powder
1 tsp salt (not iodized)
Frosting ingredients:
1 cup semisweet or bittersweet chocolate chips
1/4 cup canned evaporated milk
2 Tbsp butter
1/2 tsp vanilla
1 cup powdered sugar
1/2 cup chopped pecans or walnuts (I didn't use nuts)
Directions:
Preheat oven to 350 and grease a 9x13 inch pan. In blender, puree zucchini, oil, yogurt, sugar, and vanilla. Set aside. In a large bowl, disk together flour, cocoa, baking powder and salt. Add puree to dry ingredients and stir until moist throughout. Pour into greased pan, spread evenly, and bake 20-25 minutes until toothpick comes out clean (do not overcook!). Remove and place on cooling rack.
Frosting directions:
Combine chocolate chips, evaporated milk, butter and vanilla in a microwave proof bowl. Microwave on flu 30-40 seconds. Remove and whisk until melted and smooth (return to microwave for a few seconds if necessary). Add powdered sugar and continue to whisk until smooth. Spread evenly over brownies. Sprinkle with nuts if desired. (You can also melt the chocolate mixture over a double boiler if desired).
*****I had extra frosting left over. I put it on some plastic spoons and then put the spoons in the freezer. Perfect for adding a little chocolate to your coffee or just to eat when you need a quick chocolate fix! My kids LOVE them. Ok, so do I.*****
Zucchini Pickles (refrigerated and hot water bath canned)
Refrigerator Pickles: These pickles are nice and crisp. A little sweet for my taste, but delicious anyway. You can get the full recipe here.
**Although I put these pickles in canning jars, they must be refrigerated. I did not process them in a canner, so they are not shelf stable.**
Hot Water Bath Canned Pickles: I got this recipe from my local Master Preservers class.
Ingredients:
5 lbs medium zucchini cut into 1/4 inch slices
2 lbs mild white onion, thinly sliced
1/4 cup salt (NOT IODIZED)
ice water
4 cups cider vinegar
2 cups sugar
2 Tbsp mustard seed
1 Tbsp each celery seed AND ground turmeric
2 tsp ground ginger
3 cloves garlic, minced
Directions:
Place zucchini, onions, and salt in a large bowl and cover with ice water. Let stand for 1-2 hours. Drain, rinse, and drain again. In a large kettle mix vinegar, sugar, mustard seeds, celery seeds, turmeric, ginger, and garlic. Bring to a boil over high heat and stir to dissolve sugar. Boil for 2-3 minutes.
Stir in zucchini mixture, return to a boil and boil for 2 more minutes. Pack hot mixture into hot pint jars, leaving 1/2 inch headspace. Remove air bubbles, wipe rims, and places lids on jars. Process for 10 minutes in boiling water bath. Makes 8 pints.
And then there was the zucchini plant.
The first few harvests made me so happy. Sauteed zucchini for dinner and zucchini bread for breakfast. Yum!
And then they kept coming. And coming. And coming!
And no matter how fast I picked them, they just kept getting bigger and bigger! I would see one the size of my finger and think to myself, "Oh, good, it will be the perfect size for picking tomorrow." And then tomorrow comes and WOW! It's the size of my foot! How the heck did it grow that much in ONE NIGHT?!?!
For the last month I have had a bowl of zucchini on the counter that never gets empty. I even have to throw some away because they start to go bad! I tried keeping them in my fridge, but they started to take over (like no more room for milk or eggs), and some of them were just too big to fit at all.
Needless to say, I just CAN'T eat any more sautéed zucchini. And you can only have so much shredded zucchini and zucchini bread in the freezer.
I needed a few new things to make with the overload of zucchini we were picking. (Note to self: DEFINITELY never plant more than one zucchini plant. I don't know what we would do if we had even MORE zucchini.)
Here are some of the ideas I found, and the recipes to go with them.
Fried Zucchini Cakes I found the recipe here. Basically, you shred up some zucchini and toss it with seasonings and breadcrumbs (and an egg to hold it together). Form it into little round "cakes" and fry it in a pan until brown (I like to finish them in the oven). Great as a main course with some dipping sauce, or as a side dish.
Zucchini Bread with Pineapple I have made many different versions of zucchini bread (using milk, orange juice, nuts, chocolate chips, etc.), but never with pineapple chunks. I had to leave out the raisins and nuts so my kids will eat it, but other than that I followed the recipe found here.
Quinoa Salad with Zucchini Cook quinoa according to directions, but use chicken broth instead of plain water. Cube zucchini and sauté it quickly (just enough to make it not raw). Blanch some corn and peas (fresh or frozen). Slice a red onion. Dice tomatoes (fresh or sun dried). After the quinoa is cooked and cooled some, mix in the veggies that you prepped (whatever ratio you like, but having more quinoa than veggies for best results). Mix in chopped fresh herbs of your choice (I like oregano, thyme, and mint). Toss with you favorite vinaigrette. Add goat cheese on top of each serving. YUM!
Curried Zucchini Soup This is a really quick and easy soup to make. We ate it as a mail course with some fresh baked bread. I think I like it better warm than cold, but you can eat it either way. See the recipe here.
Zucchini Chips I didn't actually try these, because I am seriously zucchini'd out this year. But I plan to try these next year. They seem pretty easy, and maybe my kids would eat them. (Ha! Yeah right!) Slice zucchini and spread out evenly over sheet pan. Spray with oil, season with salt and pepper (and in my house we would use cajun or mexican seasoning too), and bake at 225 degrees for 45 minutes. Rotate the pan and bake for another 30-35 more minutes until browned.
Zucchini Chocolate Brownies I was pretty skeptical about this recipe. I mean, zucchini brownies? Sounds gross. But I was desperate to find new ways to use my over abundance of zucchini, so I tried it. At first I thought we would eat it without the frosting, as a way to make it more healthy. Ew. It tasted like zucchini dipped in chocolate. And it wasn't even CLOSE to having brownie texture. Bleh. So I went ahead and made the frosting, hoping it would at least make them edible enough that I didn't have to waste them. Oh. My. Gosh. Add a little homemade whipped cream? YUM! Seriously good! Not just "good enough." But actually good! Chocolatey and gooey (and sort of healthy, I guess). I made another batch and froze it for future "chocolate emergencies."
(I'm sorry, I forget where I got the recipe. Luckily I had it printed out so I can give it to you here.)
Ingredients:
2 cups chopped raw zucchini
1/4 cup vegetable oil or melted butter
1/2 cup low fat yogurt (I used greek, but regular would work too)
1 1/4 cup sugar
1 Tbsp vanilla extract
2 cups whole wheat pastry flour (I used all purpose white flour)
1/2 cup unsweetened cocoa powder
1 1/2 tsp baking powder
1 tsp salt (not iodized)
Frosting ingredients:
1 cup semisweet or bittersweet chocolate chips
1/4 cup canned evaporated milk
2 Tbsp butter
1/2 tsp vanilla
1 cup powdered sugar
1/2 cup chopped pecans or walnuts (I didn't use nuts)
Directions:
Preheat oven to 350 and grease a 9x13 inch pan. In blender, puree zucchini, oil, yogurt, sugar, and vanilla. Set aside. In a large bowl, disk together flour, cocoa, baking powder and salt. Add puree to dry ingredients and stir until moist throughout. Pour into greased pan, spread evenly, and bake 20-25 minutes until toothpick comes out clean (do not overcook!). Remove and place on cooling rack.
Frosting directions:
Combine chocolate chips, evaporated milk, butter and vanilla in a microwave proof bowl. Microwave on flu 30-40 seconds. Remove and whisk until melted and smooth (return to microwave for a few seconds if necessary). Add powdered sugar and continue to whisk until smooth. Spread evenly over brownies. Sprinkle with nuts if desired. (You can also melt the chocolate mixture over a double boiler if desired).
*****I had extra frosting left over. I put it on some plastic spoons and then put the spoons in the freezer. Perfect for adding a little chocolate to your coffee or just to eat when you need a quick chocolate fix! My kids LOVE them. Ok, so do I.*****
Zucchini Pickles (refrigerated and hot water bath canned)
Refrigerator Pickles: These pickles are nice and crisp. A little sweet for my taste, but delicious anyway. You can get the full recipe here.
To prepare for pickling, you need to toss the zucchini (or cucumber, or whatever) with salt to draw out some of the moisture. Add ice and let it sit for a few hours. You can put the veggies in a colander in a bowl to separate out the water, or just drain them when they are done. The veggies will then be able to absorb the flavors in the vinegar better.
**Although I put these pickles in canning jars, they must be refrigerated. I did not process them in a canner, so they are not shelf stable.**
Hot Water Bath Canned Pickles: I got this recipe from my local Master Preservers class.
Ingredients:
5 lbs medium zucchini cut into 1/4 inch slices
2 lbs mild white onion, thinly sliced
1/4 cup salt (NOT IODIZED)
ice water
4 cups cider vinegar
2 cups sugar
2 Tbsp mustard seed
1 Tbsp each celery seed AND ground turmeric
2 tsp ground ginger
3 cloves garlic, minced
Directions:
Place zucchini, onions, and salt in a large bowl and cover with ice water. Let stand for 1-2 hours. Drain, rinse, and drain again. In a large kettle mix vinegar, sugar, mustard seeds, celery seeds, turmeric, ginger, and garlic. Bring to a boil over high heat and stir to dissolve sugar. Boil for 2-3 minutes.
Stir in zucchini mixture, return to a boil and boil for 2 more minutes. Pack hot mixture into hot pint jars, leaving 1/2 inch headspace. Remove air bubbles, wipe rims, and places lids on jars. Process for 10 minutes in boiling water bath. Makes 8 pints.
Subscribe to:
Posts (Atom)