About a year ago, I was invited to a birthday party for a 3 year old. This particular 3 year old's family doesn't really like a lot of toys, and they appreciate handmade things. So I went on a search to find an appropriate gift to make. I finally settled on a child's apron, knowing that this little girl had recently received a play kitchen. It meant so much more to me to give something that I made. And I know she and her family felt the same way. Here is the child's apron I made for her:

***This project was done before I started my blog. Therefore, I do not have photos of the process to make this apron. I found the pattern online HERE. I pretty much followed the directions for the child size.... adjusting it a bit to fit the child I was making it for. And I did my pocket a little differently. If I make any more of these aprons, I will take pictures and do a tutorial.***
A few months later, the director of my daughter's preschool was talking to me about wanting to do a fundraiser. She said she had some extra fabric lying around and wanted to make some aprons but didn't have the time. I, having just made a child's apron, offered to turn her fabric into sellable children's aprons. Here is a picture of my son modeling one of the aprons I made from her fabric stash:

Once again, I wasn't blogging, so I don't have pictures of the process. But it was done with the same pattern as the above apron, which I found HERE.
At this point, I was so in love with making these aprons that I decided to make adult sized ones for all the women in my family (and both my kids' teachers) for Christmas. Picking out the fabric to suit each person was really fun (and really time consuming). I altered the pattern a little bit for each one depending on the fabric and the person I was making it for. I also changed the pockets. I did two pockets instead of one because that's how it is on MY favorite apron. Also, I took measurements off my favorite apron instead of using the ones on the pattern (once again, the pattern I based it on was found here). And once again, this was before my blog, so I only have an after picture of some of the girls wearing their new aprons:

That brings us up to date.
Needless to say, I am totally BORED with that apron pattern. (I still recommend it as a great basic pattern, though).
But everyone I know now has an apron, including myself. So I didn't really have a need to make any more aprons. That is, until NOW!
My friend has a cake baking/ party planning business that she recently started (Check out her website, she is SO talented). Just the other day she posted on Facebook that she needed a "sassy apron" to protect her party clothes when she was putting the final touches on the cakes at her events.
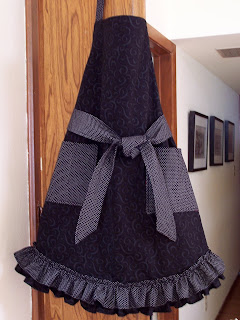
I JUMPED at the chance to make her an apron. And I was even more thrilled when she showed me what style she wanted. It's NOTHING like the ones I made before!
I searched all over the internet, but failed to find a pattern for the apron we wanted. So I had to make up my own. And now YOU get to see, step by step, how her fantastic and sassy apron came together.
Here it is: SARAH'S SASSY APRON

***If you make this apron and post it on your blog or website, please credit this post and link to it appropriately, as it is an original pattern designed by me***
Materials needed:
Materials needed:
Main Fabric (#1): 3/4 yard for front and bottom ruffle (black with gray swirls)
Coordinating Fabric (#2): 7/8 yard for back and inside pockets (cherries)
Coordinating Fabric (#2): 7/8 yard for back and inside pockets (cherries)
Coordinating Fabric (#3): 2/3 yard for ties, pockets, and top ruffle (tiny polka dots)
Matching Thread
Matching Thread
1 inch "D" ring (you will need 2 of these)
Measuring Tape
Measuring Tape
Pins
Cutting board and rotary cutter (you can just use scissors)
Scissors
Marking Pencil or Chalk
Sewing Machine (though you could do this all by hand).
Scissors
Marking Pencil or Chalk
Sewing Machine (though you could do this all by hand).
Main Pattern:

Creating the Pattern: Making this pattern is a little tricky, but I will do my best to describe how I drew the lines in the above photo.
A) Start with a large piece of paper 14 inches by 26 inches (I just used a piece of butcher paper)
B) Use one of the long edges as your "fold" edge and mark it as so.
C) At the top of your paper (the right side of this photo is what I am talking about.... the part that becomes the top of the apron), measure out 5 1/2 inches perpendicular to the fold edge. Draw this line.
D) Measure and mark a point 9 inches down the fold edge from your first line. From this point, measure out 12 inches perpendicular to the fold edge. Draw this line.
E) Measure and mark a point 11 1/2 inches further down the fold edge from your second line. From this point, measure out 14 inches perpendicular to the fold edge. Draw this line.
F) To make the arm curve: Draw a dotted line down from the end of the 5 1/2 inch line to the 12 inch line, making sure that your dotted line is parallel to the fold edge. Using this dotted line as a guide, and measuring down from the 5 1/2 inch line mark the following points: 3, 5, 6, 7, and 8 inches down. At each of these points, measure out (away from the fold edge) and make a mark at the following distances: At 3 inches, measure out 1/2 inch. At 5 inches, measure out 1 1/2 inch. 6 inches = 2 1/4 inches out. 7 inches = 3 1/4 inches out. And 8 inches = 4 1/2 inches out. You should now have 5 points that make a sloping line from the end of the 5 1/2 inch line to the end of the 12 inch line. Connect these dots to make your curve.
G) To place pockets: Draw a dotted line down from the end of the 12 inch line to the 14 inch line, making sure that your dotted line is parallel to the fold edge. The pocket should lie 2 inches in from this new dotted line and 3 inches down from the 12 inch line. (as shown in the photo).
H) To make side flare: Using the line that you drew in step G, measure down 2 inches from the end of the 12 inch line and make a mark. From this mark, draw a line to the end of the 14 inch line. (This will create a flat part to sew the waist ties on, and then make the bottom of the apron flare out a bit.)
I) To make bottom curve: Measure down 5 inches from the 14 inch line along the fold edge. This will mark the bottom center edge of your curve. Along the 14 inch line, measure from the fold edge and mark a point at 6 and 11 inches. Measure 4 inches down from the 14 inch line at the 6 inch mark and make a dot. Measure 2 inches down from the 14 inch line at the 11 inch mark and make a dot. Connect the center mark, these two new dots, and the end of the 14 inch line with a curved line. This will be your curved bottom.
J) Make two curved lines that are 1/2 inch and 1 inch from the curved edge. ***the measurements in the photo are different*** This will be your sew line for the two ruffles.
After drawing all of the lines, cut out the pattern along the outside edge.
Now you have your pattern for the main part of the apron. Cut out two pieces of fabric, remembering to fold your fabric and place the fold edge of the pattern on the folded edge of the fabric. (Cut one of the main fabric (#1) and one of the coordinating fabric (#2).
Cutting out the fabric:
Cut out the following pieces for the ties, pockets, and ruffles.
4 in by 4 in of fabric #3 (this will be part of the neck tie that holds the "D" rings) CUT ONE
4 in by 22 in of fabric #3 (this will be the long part of the neck tie) CUT ONE
5 in by 36 in of fabric #3 (this will be the waist tie) CUT TWO
7 in by 7 in of fabric #3 (this will be the pockets) CUT TWO
7 in by 7 in of fabric #2 (this will be the pocket lining) CUT TWO
3 in by 75 in of fabric #1 and #3 (this will be the ruffles) CUT ONE EACH OF 2 FABRICS
Here are photos of what pieces I cut out of which fabrics, in case you are more of a visual learner:


Sewing the pieces together:
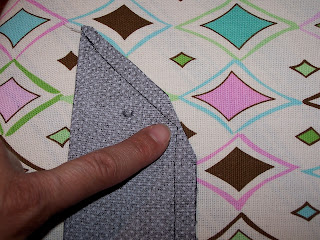
The first step is to put the pockets together. Put your fabric right sides together. Starting about 2/3 down one of the sides, sew together with a 1/2 inch seam. Stop sewing about 3 inches before where you started (this will leave you an opening to turn it right side out).

Clip each corner, being carful not to clip the stitches.

Turn the pocket right sides out. Use a pointy object (knitting needle, chopstick, etc.) to get the corners to fold properly. Pick one of the edges to be the top edge and topstitch 1/4 inch from the edge. (sorry, I forgot to get a picture of this)
Using the measurements from the pattern, measure where your pocket should go on the front piece of the apron (Main Fabric #1). You can move the pockets lower or more toward the center of the apron if you prefer. Pin the pocket to the RIGHT SIDE of the main apron piece.

Topstitch the sides and bottom of the pockets with a 1/4 inch seam. DO NOT SEW ACROSS THE TOP OF THE POCKET!! Here is a view of the stitches on the wrong side of the main apron piece (I used a contrasting thread on the back so you could see it.... these with be hidden between the front and lining fabrics).

After your pockets are sewn on, it is time to prepare the ties. First I made the little tab that holds the D rings on. Fold the 4 x4 inch piece, wrong sides together, lengthwise in half. Press.

Open the fabric. Fold in one edge to the center fold that you just made. Press along the lower edge.

Fold down the other edge to the center fold and press along the edge. You will have a piece that looks like this:

Fold the piece in half along the center fold. You will have a narrow piece that is 4 layers think.

Topstitch around the entire piece 1/4 inch from the edge. (both ends will be hidden, so you don't have to worry about the raw edges here). Thred both D rings onto this piece and set aside.
Next you will make the longer side of the neck tie (4 x 22 inch piece of fabric). You will want to finish one of the ends because it will be exposed. Fold over one short end 1/4 inch. Press.

Fold the entire piece lengthwise in half, wrong sides together. Press. Open, right side down. On the edge that you turned in 1/4 inch, fold the corners into the center fold that you just created. Press.

Fold the long edges in to the center fold. Press. (See fold lines below).

You will have a piece that looks like this:

Fold the piece in half, lengthwise to make a thin strip that is 4 layers thick. One end will be raw edges and the other end will be pointed like this:

Topstitch around the entire piece 1/4 inch from the edge. Set aside.
Next you will make the waist ties (5 x 36 inch pieces of fabric). These are done with a little different technique because I wanted them to be less "stiff" than the neck tie.
Fold the fabric lengthwise RIGHT SIDE TOGETHER. Position the fabric so that the fold is on the bottom and the open edge is on the top. Fold the top right corner down to the lower (folded) edge and press to make a crease. (**on the second tie piece, you will fold down the left top corner down so that your two pieces will be mirror images with the open edges and fold edges on the same sides**)

Unfold the corner. Using the crease as your edge, and starting at the "point", sew a 1/2 inch seam along the entire length of the piece. Do not sew closed the other end so that you can turn the piece right side out.

Trim off the extra fabric and cut a diagonal line at the corner (being careful not to clip the stitching).
Using a chopstick or knitting needle, turn the tie right side out. Pay special attention to the point and the corner to make them as "crisp" as you can. Press. Topstitch 1/4 inch from the edge all the way around the piece. Repeat to make second waist tie.
The next step is to position the ties onto the front of the apron. Lay the front apron piece down RIGHT SIDE UP. Take the short neck tie piece with the D rings on it and fold it in half, matching up raw edges. Place this tie on the top edge of the apron, 1/2 inch from the arm curve edge, and raw edges even with raw edge of apron top. Pin this tie in place.

Do the same with the longer neck tie piece on the opposite top corner of the apron. It does not matter what side the D rings are on. I prefer to have the adjustable part on my left because I am right handed and it is easier to reach across to loosen or tighten the ties. You can switch sides if you want.

You will place the waist ties on the sides of the lower portion of the apron in the same way. Make sure that the raw edge of the tie is even with the raw edge of the apron, and that the bulk of the tie lays on the apron (when you put the lining on and turn it right side out, the ties will be in the proper place). Make sure the waist ties are positioned 1/2 inch down from the corner to allow for your seam when you sew on the lining. (I'm sorry that I don't have a picture of this! I have to sew late at night when my kids are sleeping and I think I was in a bit of a hurry).
Next, position your apron lining piece on top of your apron front, RIGHT SIDES TOGETHER. Line up all of the edges and pit together. Make sure all of your ties are flat so you don't have any wrinkles in your fabric. And make sure they are out of the way of your seam so you don't accidentally sew them. Sew around the apron with a 1/2 inch seam, starting at a point on the bottom edge near the side, and ending about 5 inches before you get back to this point (so you have an opening to turn it right side out). Be careful that your fabric doesn't shift as you are sewing through many layers of fabric where each tie is.
Clip each corner and each curve. (Once again, I apologize for no pictures of these steps). Turn the apron right side out, using a knitting needle or chopstick to get each corner to be as crisp as possible. Press, making sure that you finish pressing up the seam on the bottom edge that you left open. Topstitch 1/4 inch from the edge all the way around the apron.
Prepare ruffles. (Sew pieces together to get a long enough piece if needed). Fold over 1/4 inch along all edges (wrong sides together) and topstitch 1/8 inch from edge.
Baste 1/4 AND 1/2 inch from from edge along one long side of each ruffle piece. Pulling on the end of the basting thread, slide the fabric to gather it until it makes a ruffle the length of the bottom edge of your apron. (If you have never make a ruffle before, let me know and I will do a tutorial on it).
Measure up 1/2 inch from the bottom edge of the apron. Being careful to evenly disperse the ruffling, pin the ruffle to the apron front (wrong side of ruffle to right side of apron).
***I usually divide the ruffle in half and pin the middle to the center point of the apron. Then divide each side again and pin to the apron. Then spread out ruffle between these points to create a balanced gathered look.***

Topstitch the ruffle to the apron. Repeat process with second ruffle 1/2 inch higher than the first ruffle.

You are done! Here is a peek at the apron with the lining fabric visible:


Creating the Pattern: Making this pattern is a little tricky, but I will do my best to describe how I drew the lines in the above photo.
A) Start with a large piece of paper 14 inches by 26 inches (I just used a piece of butcher paper)
B) Use one of the long edges as your "fold" edge and mark it as so.
C) At the top of your paper (the right side of this photo is what I am talking about.... the part that becomes the top of the apron), measure out 5 1/2 inches perpendicular to the fold edge. Draw this line.
D) Measure and mark a point 9 inches down the fold edge from your first line. From this point, measure out 12 inches perpendicular to the fold edge. Draw this line.
E) Measure and mark a point 11 1/2 inches further down the fold edge from your second line. From this point, measure out 14 inches perpendicular to the fold edge. Draw this line.
F) To make the arm curve: Draw a dotted line down from the end of the 5 1/2 inch line to the 12 inch line, making sure that your dotted line is parallel to the fold edge. Using this dotted line as a guide, and measuring down from the 5 1/2 inch line mark the following points: 3, 5, 6, 7, and 8 inches down. At each of these points, measure out (away from the fold edge) and make a mark at the following distances: At 3 inches, measure out 1/2 inch. At 5 inches, measure out 1 1/2 inch. 6 inches = 2 1/4 inches out. 7 inches = 3 1/4 inches out. And 8 inches = 4 1/2 inches out. You should now have 5 points that make a sloping line from the end of the 5 1/2 inch line to the end of the 12 inch line. Connect these dots to make your curve.
G) To place pockets: Draw a dotted line down from the end of the 12 inch line to the 14 inch line, making sure that your dotted line is parallel to the fold edge. The pocket should lie 2 inches in from this new dotted line and 3 inches down from the 12 inch line. (as shown in the photo).
H) To make side flare: Using the line that you drew in step G, measure down 2 inches from the end of the 12 inch line and make a mark. From this mark, draw a line to the end of the 14 inch line. (This will create a flat part to sew the waist ties on, and then make the bottom of the apron flare out a bit.)
I) To make bottom curve: Measure down 5 inches from the 14 inch line along the fold edge. This will mark the bottom center edge of your curve. Along the 14 inch line, measure from the fold edge and mark a point at 6 and 11 inches. Measure 4 inches down from the 14 inch line at the 6 inch mark and make a dot. Measure 2 inches down from the 14 inch line at the 11 inch mark and make a dot. Connect the center mark, these two new dots, and the end of the 14 inch line with a curved line. This will be your curved bottom.
J) Make two curved lines that are 1/2 inch and 1 inch from the curved edge. ***the measurements in the photo are different*** This will be your sew line for the two ruffles.
After drawing all of the lines, cut out the pattern along the outside edge.
Now you have your pattern for the main part of the apron. Cut out two pieces of fabric, remembering to fold your fabric and place the fold edge of the pattern on the folded edge of the fabric. (Cut one of the main fabric (#1) and one of the coordinating fabric (#2).
Cutting out the fabric:
Cut out the following pieces for the ties, pockets, and ruffles.
4 in by 4 in of fabric #3 (this will be part of the neck tie that holds the "D" rings) CUT ONE
4 in by 22 in of fabric #3 (this will be the long part of the neck tie) CUT ONE
5 in by 36 in of fabric #3 (this will be the waist tie) CUT TWO
7 in by 7 in of fabric #3 (this will be the pockets) CUT TWO
7 in by 7 in of fabric #2 (this will be the pocket lining) CUT TWO
3 in by 75 in of fabric #1 and #3 (this will be the ruffles) CUT ONE EACH OF 2 FABRICS
Here are photos of what pieces I cut out of which fabrics, in case you are more of a visual learner:

One apron piece (folded) and two strips to make up the ruffle piece out of Main Fabric (#1).

One apron piece (folded) and two pocket pieces out of coordinating fabric (#2).

One strip for ruffle (length of strip is cut off in photo), two strips for waist ties, two pocket pieces, one long strip for neck tie, and one short strip for neck tie out of coordinating fabric (#3).
The first step is to put the pockets together. Put your fabric right sides together. Starting about 2/3 down one of the sides, sew together with a 1/2 inch seam. Stop sewing about 3 inches before where you started (this will leave you an opening to turn it right side out).

Clip each corner, being carful not to clip the stitches.

Turn the pocket right sides out. Use a pointy object (knitting needle, chopstick, etc.) to get the corners to fold properly. Pick one of the edges to be the top edge and topstitch 1/4 inch from the edge. (sorry, I forgot to get a picture of this)
Using the measurements from the pattern, measure where your pocket should go on the front piece of the apron (Main Fabric #1). You can move the pockets lower or more toward the center of the apron if you prefer. Pin the pocket to the RIGHT SIDE of the main apron piece.

Topstitch the sides and bottom of the pockets with a 1/4 inch seam. DO NOT SEW ACROSS THE TOP OF THE POCKET!! Here is a view of the stitches on the wrong side of the main apron piece (I used a contrasting thread on the back so you could see it.... these with be hidden between the front and lining fabrics).

After your pockets are sewn on, it is time to prepare the ties. First I made the little tab that holds the D rings on. Fold the 4 x4 inch piece, wrong sides together, lengthwise in half. Press.

Open the fabric. Fold in one edge to the center fold that you just made. Press along the lower edge.

Fold down the other edge to the center fold and press along the edge. You will have a piece that looks like this:

Fold the piece in half along the center fold. You will have a narrow piece that is 4 layers think.

Topstitch around the entire piece 1/4 inch from the edge. (both ends will be hidden, so you don't have to worry about the raw edges here). Thred both D rings onto this piece and set aside.
Next you will make the longer side of the neck tie (4 x 22 inch piece of fabric). You will want to finish one of the ends because it will be exposed. Fold over one short end 1/4 inch. Press.

Fold the entire piece lengthwise in half, wrong sides together. Press. Open, right side down. On the edge that you turned in 1/4 inch, fold the corners into the center fold that you just created. Press.

Fold the long edges in to the center fold. Press. (See fold lines below).

You will have a piece that looks like this:

Fold the piece in half, lengthwise to make a thin strip that is 4 layers thick. One end will be raw edges and the other end will be pointed like this:

Topstitch around the entire piece 1/4 inch from the edge. Set aside.
Next you will make the waist ties (5 x 36 inch pieces of fabric). These are done with a little different technique because I wanted them to be less "stiff" than the neck tie.
Fold the fabric lengthwise RIGHT SIDE TOGETHER. Position the fabric so that the fold is on the bottom and the open edge is on the top. Fold the top right corner down to the lower (folded) edge and press to make a crease. (**on the second tie piece, you will fold down the left top corner down so that your two pieces will be mirror images with the open edges and fold edges on the same sides**)

Unfold the corner. Using the crease as your edge, and starting at the "point", sew a 1/2 inch seam along the entire length of the piece. Do not sew closed the other end so that you can turn the piece right side out.

Trim off the extra fabric and cut a diagonal line at the corner (being careful not to clip the stitching).

Using a chopstick or knitting needle, turn the tie right side out. Pay special attention to the point and the corner to make them as "crisp" as you can. Press. Topstitch 1/4 inch from the edge all the way around the piece. Repeat to make second waist tie.
The next step is to position the ties onto the front of the apron. Lay the front apron piece down RIGHT SIDE UP. Take the short neck tie piece with the D rings on it and fold it in half, matching up raw edges. Place this tie on the top edge of the apron, 1/2 inch from the arm curve edge, and raw edges even with raw edge of apron top. Pin this tie in place.

Do the same with the longer neck tie piece on the opposite top corner of the apron. It does not matter what side the D rings are on. I prefer to have the adjustable part on my left because I am right handed and it is easier to reach across to loosen or tighten the ties. You can switch sides if you want.

You will place the waist ties on the sides of the lower portion of the apron in the same way. Make sure that the raw edge of the tie is even with the raw edge of the apron, and that the bulk of the tie lays on the apron (when you put the lining on and turn it right side out, the ties will be in the proper place). Make sure the waist ties are positioned 1/2 inch down from the corner to allow for your seam when you sew on the lining. (I'm sorry that I don't have a picture of this! I have to sew late at night when my kids are sleeping and I think I was in a bit of a hurry).
Next, position your apron lining piece on top of your apron front, RIGHT SIDES TOGETHER. Line up all of the edges and pit together. Make sure all of your ties are flat so you don't have any wrinkles in your fabric. And make sure they are out of the way of your seam so you don't accidentally sew them. Sew around the apron with a 1/2 inch seam, starting at a point on the bottom edge near the side, and ending about 5 inches before you get back to this point (so you have an opening to turn it right side out). Be careful that your fabric doesn't shift as you are sewing through many layers of fabric where each tie is.
Clip each corner and each curve. (Once again, I apologize for no pictures of these steps). Turn the apron right side out, using a knitting needle or chopstick to get each corner to be as crisp as possible. Press, making sure that you finish pressing up the seam on the bottom edge that you left open. Topstitch 1/4 inch from the edge all the way around the apron.
Prepare ruffles. (Sew pieces together to get a long enough piece if needed). Fold over 1/4 inch along all edges (wrong sides together) and topstitch 1/8 inch from edge.
Baste 1/4 AND 1/2 inch from from edge along one long side of each ruffle piece. Pulling on the end of the basting thread, slide the fabric to gather it until it makes a ruffle the length of the bottom edge of your apron. (If you have never make a ruffle before, let me know and I will do a tutorial on it).
Measure up 1/2 inch from the bottom edge of the apron. Being careful to evenly disperse the ruffling, pin the ruffle to the apron front (wrong side of ruffle to right side of apron).
***I usually divide the ruffle in half and pin the middle to the center point of the apron. Then divide each side again and pin to the apron. Then spread out ruffle between these points to create a balanced gathered look.***

Topstitch the ruffle to the apron. Repeat process with second ruffle 1/2 inch higher than the first ruffle.

You are done! Here is a peek at the apron with the lining fabric visible:


